
Configuring Jenkins to Work With a Proxy Server
So many people find that they have an issue when trying to use their proxy server with Jenkins. Consider the following setup:
At the primary site (A), a reverse proxy is used; JTS & CCM server. At remote site (B), there is a proxy server and squid is used for caching. This is, of course, necessary to improve the loading time of source code. The remote site also has Jenkins server configured to manage build but there is a problem using proxy with Jenkins.
If you have similar issues, then what you have to do on your host is;
- Open internet explorer on your computer
- Navigate to Internet options and open the connection tab
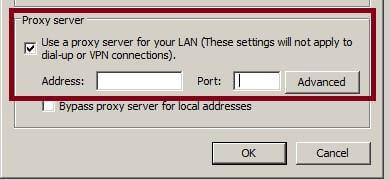
- Select LAN settings
- You will find configuration interphase. Enter the proxy server host name and port there
These steps work when using Visual Studio; that is outside Jenkins. If you then make use of the same steps on the Jenkins server and run a job, it will ignore the proxy settings in internet explorer. There are two other solutions to the problem of Jenkins not working with a proxy server. These solutions are explained below:
Solution 1
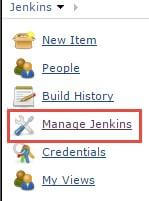
- Open your Jenkins GUI.
- From there, select manage Jenkins.
- Navigate to manage plugins and select it.

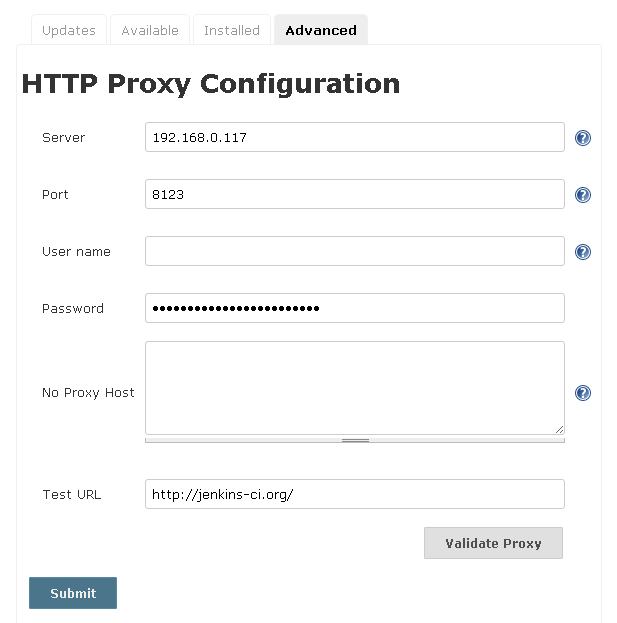
- Select the Advanced tab.
- You will see a space for the entry of proxy server host name and port number. Enter the respective details there.

- Select the Advanced….. button to validate the test URL. If everything works, then click on submit to save.
- Finally, restart Jenkins and check to ensure that the proxy settings are still intact. Then perform a workspace load with Jenkins to test if the two now work together.
Solution 2
- Log on to your Jenkins master host
- From the result, navigate to installation directory for Jenkins (C:/Program Files (x86)\Jenkins)
- Make a copy of the file Jenkins.xml as a backup
- Edit the Jenkins.xml file and add the following for starting Jenkins:
-Dhttp.proxyHost=http//ProxyServerName –Dhttp.proxyPort=3128
In the file, XML looks like this;
jenkins
jenkins
This service runs Jenkins continuous integration system.
<!—
If you prefer to run Jenkins with a version of java you have in mind, then specify a full path to java.exe.
Seeing the following is an indication that you have java in your path:
-->
%BASE%\jre|bin|java
-Dhttp.proxyHost=http://ProxyServerName –Dhttp.proxyPort=3128 –Xrs –Xmx256m –Djava.library.path=â€C:\natives;%path%†–Dhudson.lifecycle=Hudson.lifecycle.WindowsServiceLifecycle –jar “%BASE%jenkins.warâ€
rotate
Save the file and restart Jenkins. Then perform a workspace load with a Jenkins job to test your settings.
Post Quick Links
Jump straight to the section of the post you want to read:
How to Use Jenkins behind a Proxy
Trying to make Jenkins work behind a proxy can be a bit difficult feat to achieve. It takes some mistakes and trials and errors before you can achieve it if lucky. Good for you, they won’t be any of that as I will guide you through everything from start to finish. If possible, you could make us Dockerized Jenkins as it is better, but what I use is the WAR package.
Installation
When installing Jenkins for the first time, Jenkins will make suggestions that you install some plugins and set up some proxy settings. The settings and plugins don’t always work but it can be done later on.
Proxy Settings
From the Jenkins dashboard, move to manage Jenkins > manage plugins. From there select Advanced tab, which is the last of all four tabs.
In the appropriate spaces, enter your proxy server URL and port address. They may be no need to type the username and password. You could just use http://www.google.com as a test URL so as to validate your proxy settings.
Interesting Read : How to Use and Configure Proxy in Git?
Once validated, you can now move down the page to where you can get all plugin information from the Jenkins server. There is a button at the right bottom of the page to check if you are done. If you are not done, you will get an SSLHandshakeException. This means you have to try again.
Seeing this means that Jenkins is not able to retrieve the information it needs from that URL. So you will have to change from HTTPS to HTTP. This is a simple solution to the SSLHandshakeException problem. Having done that, give it another try and use the bottom right button that says check now. Hopefully, all will go on well with no error messages.
Now it is time to check the ‘Available’ tab for the plugins that can be installed. The problem you will face at this stage is that you will have to wait for a while. Parsing all the information takes time and Jenkins will get stacked loading the page. You can do something else at this point to kill time but everything will work out fine in the end.
Interesting Read : Step By Step Guide To Configure Apache Reverse Proxy
During normal operation using Jenkins, there are several background jobs that will try to use the internet. This isn’t a problem as long as there is direct internet access provided to the machine you are using Jenkins on. However, it can lead to different kinds of issues as soon as the HTTP and/or HTTPS proxy server is the only way to get out on the internet from Jenkins. So in this section, you will get all the help you need in using Jenkins properly behind a proxy server.
Type of Proxy
The first step to understanding your problem is to find out the kind of proxy that is being used in your network. There are major types of proxies and they come with their own ways of operation. Note that NAT (Network Address Translation) is not a proxy. If your network only uses NAT to access the internet, then you are fine and have no problem.
What happens in large and conservative organizations is that the network administrators ensure that internet access is not just direct but mediated. Since the use of just NAT doesn’t provide any form of either filtering any content or do cache, it is replaced with HTTP(S) proxies. One way of knowing the type of proxy you use is by going into the browser’s network connection settings. If you can have access to this and there is anything with a configuration like “HTTP proxy: some.proxy.net:1234â€, then the proxy you are using seems to be an HTTP(S) proxy. Also, if there is an automated proxy configuration (proxy.pac or determine proxy settings automatically), the automatic configuration setup is most likely to involve an HTTP(S) proxy.
Interesting Read : How To Configure Proxy Settings in Windows 10?
Finding out the proxy number and address of your proxy is left for you to figure out based on the type of proxy you use. You could use a search engine to help out with this or contact your network administrator to help you out with this information.
Also, note that everything explained here is to help you with Jenkins and your proxy. It is in no way meant to make you go against the policies of your network administrator. Why Jenkins is used with proxy to access the internet is for the convenience it brings. An example of what I mean here is the update of plugins. Jenkins has an update mechanism for plugins that checks the plugin repository on the internet for new versions of the plugin and allows you to install the update with just a single click. Not making use of Jenkins with your proxy server to access the internet will prevent this function from taking place. The way you would now have to update your plugins will be by manually downloading them and installing them. It means more work.
How Does Jenkins Handle Proxy Servers?
You can configure the proxy server that you want to use with Jenkins by going to manage Jenkins > manage plugins > advanced. This is the preferred option instead of setting JVM properties. An image is contained below to show you an example of the configuration:
The following table describes the fields and what they do:
Server
This contains the host name or address if the proxy server. An example is lime.proxies.com
Port
This is the port your proxy server listens on. An example of this is 8080
Username
If it is required that the proxy server needs authentication, enter the name of the user in this space
Password
If it is required that the proxy server needs authentication, enter the password in this space
No proxy host
If you must contact certain hosts without having to go through the proxy, you can specify their names here. You can even choose to use an asterisk as a wildcard. An example of this is *jenkins-test.example.com
Test URL
To test the proxy configuration, enter the full URL that you want to use here. An example is http://limeproxies.com
If you want to disable the proxy configuration temporarily, just add a wildcard character like an asterisk (*) on the first line. This will erase the value of the server and discard and disable the use of the proxy server.
Interesting Read : How Socks5 proxies solves online issues?
Examples of plugins that support a proxy server are:
- Fortify On Demand Uploader Plugin
- Git Plugin
- Azure DevOps and Team Foundation Server Plugin
- Opened Connect Authentication Plugin


About the author
Rachael Chapman
A Complete Gamer and a Tech Geek. Brings out all her thoughts and Love in Writing Techie Blogs.
View all postsRelated Articles
Datacenter vs Residential Proxies: Which Should You Choose in 2026?
Datacenter proxies are faster and cheaper for most tasks. Residential proxies handle heavily bot-protected sites. This guide breaks down every difference so you pick the right type — and avoid overpaying.
How to Use Proxies for E-Commerce Price Monitoring in 2026
Proxies are the backbone of reliable e-commerce price monitoring. Discover how to track competitor prices at scale, beat anti-bot systems, monitor geo-specific pricing, and build a full price intelligence stack in 2026.
Web Scraping With Proxies: The Complete Guide for 2026
Web scraping with proxies lets developers and businesses collect data at scale without IP bans or rate limits. This complete 2026 guide covers Python setup, proxy rotation, tool comparisons, anti-bot tactics, and ethical best practices.